Sentinel Camera Calibration

In December of 2008, after a series of back of the envelope type discussions on how to calibrate a Sentinel camera, Ken formalized the discussions in a pdf. To see Ken’s method Click here for Ken’s original paper on how we can calibrate the Sentinel camera.

As a footnote I (Jeff) did a work through with my camera system. After the spreadsheet was made and a small Python program run Ken took my results and plotted it to see how his model stood up. Here are those results.


Hi Jeff,

I could not resist having a quick look. Your data is lovely. I simply plotted

R = sqrt((x-x0)2+(y-y0)2)

against zenith angle.

In the first plot I assumed the camera zenith was (371,240), and in the second I optimized it, and got (370,231). This of course would be the camera zenith not the centre of the frame.

HOWEVER: Look at the nice clean plot and good correlation. I think you can use the camera zenith method and ignore trying to find the centre of the frame; they are obviously very close because the plot, including the very slight nonlinearity due to the fisheye effect, integrates so cleanly.

The very slight fisheye effect can be approximated more than adequately by a 2nd-order polynomial, as Martin Connors said it would.

I would say, for your system, you should be able to simply calculate R and use the equation to get the zenith angle, and then do a rotation to find the azimuth error…. job done.

Regards,

Ken


Sentinel III system in photos

The Camera and Housing

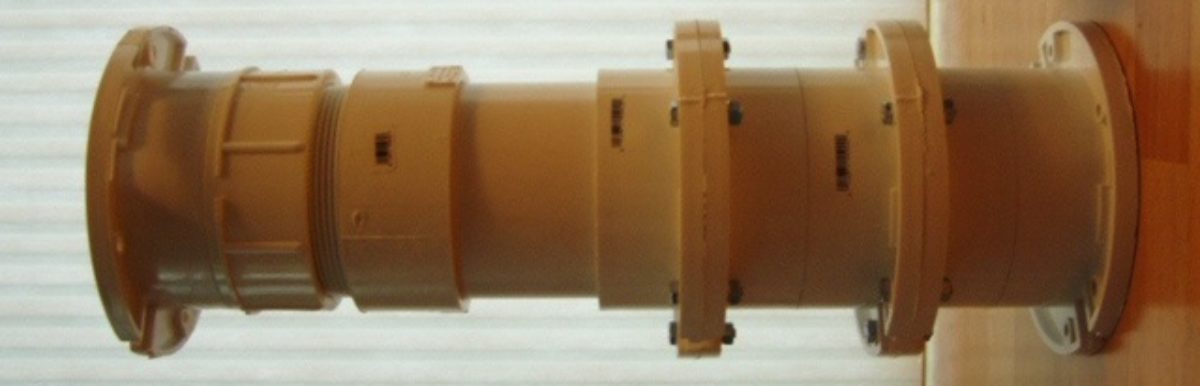
The housing for the camera, the anti-dew heater, the thermostat, and fan are all housed inside a PVC tube and toilet flange.
As packed for shipping. Stands approximately 0.5 meter tall.

Top shipping end removed reveals the camera and baffle.

Top Baffle

The Rainbow L163VDC4P fisheye lens mounted on the camera body. Note the PVC stiffener rods with coax cable running through it..

fisheye lens

Preparation for calibrating a Sentinel Camera

Steps to take prior to calibrating a Sentinel Camera

Flesh out – PLACEHOLDER ONLY!

Put the procedure here.

  1. Make long exposure after each capture… TIF format
  2. Use GIMP, Paint, PhotoShop or other image processing program and push the brightness and contrast
  3. After photo brings out the hidden starts run a planetarium program. Looking south, elv 90, fov 180.
  4. Match the stars noting pixel x/y on photo and az/el on the planetarium.
  5. run python program calpos.py This produces a personalized correction file that will be used for triangulation. (See Ken’s pdf on the process)

Student UFO2 User Guide

The Sonotaco.com site provides you with the latest capture and analysis software. The basic requirements are:

1) UFOCaptureV2 V2.22 to capture the data. Registration of this program is required after 30 days and the cost is 18900 Japanese Yen. Use this currency converter to determine the cost in your currency. You’ll also need the Users Manual. It is offered in an html and zipped format.

2) UFOAnalyzer V2 V2.28 to analyze the data. This is a free program. Provided in a pdf and zipped format, the Users Manual is essential to understanding this program. If you are a BC camera operator, download and install the Map of Canada (West) file. Scroll down to the bottom of the page to locate it. Extract the file to the UA2 root directory.

3) UFOOrbitV2 V2.25 to determine the meteor’s orbit. This is a free program. The Users Manual for this utility is offered in a pdf and zipped format.

The BBS Forum is also a good source of user information. You don’t need to speak or read Japanese 🙂


For those people that simply want to analyze the data, follow steps 2 and 3, and then do the following:

4) Download the contents of the UProfiles for UFO2 operators folder found in the Data Downloads/Video Data Downloads section and install the contents into the PROF folder of UA2.

5) To analyze individual captures, select a file found in the Data Downloads/Video Data Downloads section from any of the observatories using UFO2. At the moment, they are RASCPG, RDL, Shane, and Tatla. Download and extract the files into your directory. How you set up your directory is up to you. Use UA2 to analyze the data and plot a ground map.

6) To analyze common captures, you will download and analyze the files from Data Downloads/Video Data Downloads/Common Captures individually (don’t forget to select the profile for the site you are working with)…but you will perform one final step involving the use of Paint.NET. You will have saved the UA2 ground map from each site analysis. Using the Paint.NET tutorial, overlay the ground maps to determine the intersecting point.

7) When you have determined the intersecting point, email your results for confirmation to the administrator of this site. Your files will include the .XML and ground map files for each of the sites you worked with, as well as the overlay map from Paint.NET. Once your data is confirmed with other site users, it will be posted in the Video Results and Papers section and forwarded on to the Coordinator of the Canadian Fireball Reporting Centre at the University of Calgary.


Camera systems introduction

Temp Place holder

Camera systems currently in use by network members include the Sentinel camera a Sony, the Watec 902H, and the PC164CEX-2.

Sentinel camera:

The Sentinel III camera is a Sony HiCam HB-710E. The CCD (Charge Coupled Device) is a 1.27 cm (0.5 inch) interlined chip with 410K pixels. Effective Pixels 768 (Horizontal) X 494 (Vertical). It has a super-low illumination environment of 0.0005 Lux(F1.2 /20 IRE at AGC Max). It is powered by +12VDC and consumes 150 mA at maximum load.

The lens is Rainbow L163VDC4P fisheye lens with a 180 degree field.

For a pictorial tour of the Sony HiCam HB-710E camera, it’s housing and frame grabber click here.

The Sentinel – video frame grabber comes in an external box. It contains a micro-controller, a RCM3200, from Rabbit Semiconductor. There are three connections on the box, 1) +3.3V DC input, 2) a BNC male connector for the 1Vp-p video input from the Sony camera via 75 ohm coax, and 3) an Ethernet jack. The frame grabber communicates with a PC via the ethernet cable either directly with a crossover cable or through a LAN hub via a conventional ethernet cable.

The Sentinel III system is being replaced by the Sentinel IV system which uses the same camera but uses an internal Hauppaugue model 188 video  card.

Watec 902H

PC164CEX-2

acrylic domes from EZ Tops in New Brunswick.

fisheye lens, sources


Video Software systems

A place holder for discussing video software

Software systems:

Sentinel II

The Sentinel II was earliest of the Sentinel camera system used by the BCMN. It used a convex mirror with the camera above the reflecting mirror. Video was feed into a VCR. Users then scanned the nights catch the next day or when there was a report of a fireball.

Sentinel III

This system is still in use by many of the operators of the BCMN. The camera and associated hardware can be seen in a picture essay here Sentinel III system in photos. The system uses an external frame grabber which has firmware burned into a EPROM chip. The frame grabber has an IP address of 10.0.0.1 and communicates with the host computer via a Null type ethernet cable.

Pros:

  1. The software runs on very old, less capable computers without straining them.
  2. The software can run multiple platforms/systems as is.
  3. Software is written in a clear logical way and can be modified easily.
  4. Stable and will run for months at a time.

Cons:

  1. The external frame grabber takes time to download the capture to the software so some meteors are missed during this transaction.
  2. Frame grabber ties up an Ethernet port
  3. On some routers it is impossible to run a net time server due to the 10.0.0.# addressing or port loss.
  4. No stacking of images to bring out the stars. The make long exposure after event helps but is not that powerful.
  5. Shelf space taken up by external frame grabber, cable, and power supply cords.

Sentinel IV

Is the next generation in the Sentinel line. This system employs an internal video card; the Hauppauge ImpactVCB model 188 board.

The software is in beta testing so it is hard to list the pros and the cons. Many of the cons have been squashed in the last couple of upgrades. When fully developed the software is suppose to automatically ftp the events back to New Mexico where it will be analyzed. This feature has not been implemented as of yet.

Pros:

The biggest improvement is the near real time capture and data writing. There are no longer dead seconds (sometimes minutes) while the card downloads to the computer. This leads to much less loss of data during showers.  It does have a method to simulate stacking frames that helps define dimmer stars.

I see two cons so far. The first is the software’s dependence on Windows system software. I can not be run on Linux or Mac computers without going to a virtual machine and running Windows. I see this as a big step backwards although Window users will not be that impacted by the switch. The other con is the code is compiled so there is no way to easily read  or modify the source code.

It is too soon to tell how stable the final version of the software will be or what planned features will make the final cut.


UFOCapture

Unlike Sentinel software UFOCaptureV2 (V2.22  2008/11/28) is not freeware, it is a commercial product. There are two other sets of software that analyze the UFOCapture files, UFOAnalyzer V2 (V2.28 2010/02/28)  and UFO Oribit (V2.25 2010/02/28). They both are freeware and they will be covered in the Video Analysis section.

Pros:

  1. Works with multiple camera types.
  2. Highly flexible can fine tune to observer’s needs.
  3. Overlays a Time stamps on the video images.
  4. Easy to make masking
  5. Software notes and produces scintillation masks.
  6. Can fine tune the triggering and greatly reduce or eliminate aircraft, spiders, and bird triggers.
  7. Records more stars than Sentinel does during exposures.
  8. Multiple meteor capture possible
  9. Coupled with the two associate analysis software the trio gives the user a very powerful tool, especially with multi-station captures.


Cons:

  1. Needs a video to digital card like Canopus or the Hauppauge card that comes with Sentinel IV.
  2. Expensive license versus freeware and shareware.
  3. The manual was originally written in Japanese and the English translation is fairly choppy and hard to understand at times.
  4. Eats up a lot cpu cycles so a newer, faster and more capable computer is needed compared to a Sentinel system
  5. The software is so full of features it presents a steep learning curve before feeling at ease with it.


HandAvi


Note: Video Analysis software will be covered in the Analysis section of this site.


2009 11 08 Prince George Fireball

On November 8, 2009, Wayne, at RDL Observatory, reported a capture of a bright fireball to our network. He told us:

“All
Late night capture, direction of travel westward. Event seen at Telkwa BC. UFO analyzer places impact area some where in the Terrace / Telkwa area but calibration of ufo analyzer is uncertain.  Witness at Telkwa said phosphor like drops falling between him and hill 1 mile to his north.  No Sound heard. enjoy
wayne”

Wayne sent a movie of the event to the BCMN group. You can view it here:


Upon receipt of Wayne’s report Brower wrote Alan Hildebrand, Coordinator of the Canadian Fireball Reporting Centre, and asked if he was getting any additional reports of the event. He said he had not heard of the event.

In between e-mails Hildebrand checked back in his mail and found the alert Wayne had sent earlier. (It’s always  good to follow up if you don’t hear back).

CBC carried and article the next day. You can view the article by clicking here.

On November 9th Hidlebrand (personal communication to Brower) summarized to the MIAC group. The fireball was:

  1. Seen widely.
  2. It caused explosive booms and cast ground shadows.
  3. He estimated the fireball to be in the  -17 to -18 magnitude range.
  4. Estimate ‘conservatively in 100 kg to 1 tonne order of magnitude’.
  5. Had an east to west motion (and apparently some south to north and at least modestly steep) which would be reasonable for prefall orbits.
  6. Was probably a meteorite dropper.

No other BCMN camera recorded the fireball.


2008 09 09 The SPE Outbreak

As the sun was about to rise on September 9, 2008 an unpredicted outbreak of the September Perseid shower occurred.

Jeff, at the West Kelowna site, checked his overnight Sentinel video captures and quickly noted an unusual cluster of fireballs. Below is a composite image of of the outbreak.

Brower notified Dr. Peter Jenniskens of the large number of fireballs via e-mail. Jenniskens then sent inquiries to other observers to confirm the outbreak. Almost simultaneously reports of the outbreak started coming in on various meteor forums . As soon as Jenniskens received supporting information he issued a telegram, CBET 1501, as shown below.

CBET 1501 SPE 2008


2008 02 19 PNW Bolide

On February 19, 2008 at 13:30 UT, a large fireball entered the earth’s upper atmosphere. Visual reports of the bolide started streaming in at police stations and television stations. A regional airline pilot filed a report of a possible aircraft going down over western Washington.

At 13:30:59 UT the West Kelowna Sentinel all-sky camera caught was triggered by a extremely bright bolide. The video showed the bolide moving slowly downward towards my southeastern horizon. It disappeared behind the mountains across the Okanagan Lake. Despite being below my horizon behind the mountain range the sky pulsed with light as the bolide went through several terminal bursts as can be seen by the total amplitude light curve produced by the Sentinel camera:


A look at the total number of pixels above the triggering threshold shows most of the light was released during it’s terminal flares.

Total Pixels graph

The graphs as well as the movie was sent to Dr. Alan Hildebrand, Coordinator of the Canadian Fireball Reporting Centre, University of Calgary.